


参考文章 : http://blog.csdn.net/liuhe688/article/details/6532519
在Android中实现异步任务机制有两种方式,Handler和AsyncTask。
Handler模式需要为每一个任务创建一个新的线程,任务完成后通过Handler实例向UI线程发送消息,完成界面的更新,这种方式对于整个过程的控制比较精细,但也是有缺点的,例如代码相对臃肿,在多个任务同时执行时,不易对线程进行精确的控制。
为了简化操作,Android1.5提供了工具类android.os.AsyncTask,它使创建异步任务变得更加简单,不再需要编写任务线程和Handler实例即可完成相同的任务,但其内部也是使用Handler来传递消息,而且基于线程池。因此明显的AsyncTask比Handler要重量级。
先来看看AsyncTask的定义:
- public abstract class AsyncTask<Params, Progress, Result> {
三种泛型类型分别代表“启动任务执行的输入参数”、“后台任务执行的进度”、“后台计算结果的类型”。在特定场合下,并不是所有类型都被使用,如果没有被使用,可以用java.lang.Void类型代替。
一个异步任务的执行一般包括以下几个步骤:
1.execute(Params... params),执行一个异步任务,需要我们在代码中调用此方法,触发异步任务的执行。
2.onPreExecute(),在execute(Params... params)被调用后立即执行,一般用来在执行后台任务前对UI做一些标记。
3.doInBackground(Params... params),在onPreExecute()完成后立即执行,用于执行较为费时的操作,此方法将接收输入参数和返回计算结果。在执行过程中可以调用publishProgress(Progress... values)来更新进度信息。
4.onProgressUpdate(Progress... values),在调用publishProgress(Progress... values)时,此方法被执行,直接将进度信息更新到UI组件上。
5.onPostExecute(Result result),当后台操作结束时,此方法将会被调用,计算结果将做为参数传递到此方法中,直接将结果显示到UI组件上。
在使用的时候,有几点需要格外注意:
1.异步任务的实例必须在UI线程中创建。
2.execute(Params... params)方法必须在UI线程中调用。
3.不能在doInBackground(Params... params)中更改UI组件的信息。
4.一个任务实例只能执行一次,如果执行第二次将会抛出异常。
一 、 AsyncTask的使用示例
接下来,我们来看看如何使用AsyncTask执行异步任务操作,我们先建立一个项目,结构如下:

结构相对简单一些,让我们先看看MainActivity.java的代码:
- package com.scott.async;
- import java.io.ByteArrayOutputStream;
- import java.io.InputStream;
- import org.apache.http.HttpEntity;
- import org.apache.http.HttpResponse;
- import org.apache.http.HttpStatus;
- import org.apache.http.client.HttpClient;
- import org.apache.http.client.methods.HttpGet;
- import org.apache.http.impl.client.DefaultHttpClient;
- import android.app.Activity;
- import android.os.AsyncTask;
- import android.os.Bundle;
- import android.util.Log;
- import android.view.View;
- import android.widget.Button;
- import android.widget.ProgressBar;
- import android.widget.TextView;
- public class MainActivity extends Activity {
- private static final String TAG = "ASYNC_TASK";
- private Button execute;
- private Button cancel;
- private ProgressBar progressBar;
- private TextView textView;
- private MyTask mTask;
- @Override
- public void onCreate(Bundle savedInstanceState) {
- super.onCreate(savedInstanceState);
- setContentView(R.layout.main);
- execute = (Button) findViewById(R.id.execute);
- execute.setOnClickListener(new View.OnClickListener() {
- @Override
- public void onClick(View v) {
- // 注意每次需new一个实例,新建的任务只能执行一次,否则会出现异常
- mTask = new MyTask();
- mTask.execute("http://www.baidu.com");
- execute.setEnabled(false);
- cancel.setEnabled(true);
- }
- });
- cancel = (Button) findViewById(R.id.cancel);
- cancel.setOnClickListener(new View.OnClickListener() {
- @Override
- public void onClick(View v) {
- //取消一个正在执行的任务,onCancelled方法将会被调用,实际上是调用了FutureTask的取消操作,关于FutureTask下文会有介绍
- mTask.cancel(true);
- }
- });
- progressBar = (ProgressBar) findViewById(R.id.progress_bar);
- textView = (TextView) findViewById(R.id.text_view);
- }
- private class MyTask extends AsyncTask<String, Integer, String> {
- //onPreExecute方法用于在执行后台任务前做一些UI操作
- @Override
- protected void onPreExecute() {
- Log.i(TAG, "onPreExecute() called");
- textView.setText("loading...");
- }
- // doInBackground方法内部执行后台任务,不可在此方法内修改UI,运行在后台线程。
- @Override
- protected String doInBackground(String... params) {
- Log.i(TAG, "doInBackground(Params... params) called");
- try {
- HttpClient client = new DefaultHttpClient();
- HttpGet get = new HttpGet(params[0]);
- HttpResponse response = client.execute(get);
- if (response.getStatusLine().getStatusCode() == HttpStatus.SC_OK) {
- HttpEntity entity = response.getEntity();
- InputStream is = entity.getContent();
- long total = entity.getContentLength();
- ByteArrayOutputStream baos = new ByteArrayOutputStream();
- byte[] buf = new byte[1024];
- int count = 0;
- int length = -1;
- while ((length = is.read(buf)) != -1) {
- baos.write(buf, 0, length);
- count += length;
- //调用publishProgress公布进度,最后onProgressUpdate方法将被执行
- publishProgress((int) ((count / (float) total) * 100));
- //为了演示进度,休眠500毫秒
- Thread.sleep(500);
- }
- return new String(baos.toByteArray(), "gb2312");
- }
- } catch (Exception e) {
- Log.e(TAG, e.getMessage());
- }
- return null;
- }
- // onProgressUpdate方法用于更新进度信息
- @Override
- protected void onProgressUpdate(Integer... progresses) {
- Log.i(TAG, "onProgressUpdate(Progress... progresses) called");
- progressBar.setProgress(progresses[0]);
- textView.setText("loading..." + progresses[0] + "%");
- }
- // onPostExecute方法用于在执行完后台任务后更新UI,显示结果。 运行在UI线程
- @Override
- protected void onPostExecute(String result) {
- Log.i(TAG, "onPostExecute(Result result) called");
- textView.setText(result);
- execute.setEnabled(true);
- cancel.setEnabled(false);
- }
- //onCancelled方法用于在取消执行中的任务时更改UI
- @Override
- protected void onCancelled() {
- Log.i(TAG, "onCancelled() called");
- textView.setText("cancelled");
- progressBar.setProgress(0);
- execute.setEnabled(true);
- cancel.setEnabled(false);
- }
- }
- }
布局文件main.xml代码如下:
- <?xml version="1.0" encoding="utf-8"?>
- <LinearLayout xmlns:android="http://schemas.android.com/apk/res/android"
- android:orientation="vertical"
- android:layout_width="fill_parent"
- android:layout_height="fill_parent">
- <Button
- android:id="@+id/execute"
- android:layout_width="fill_parent"
- android:layout_height="wrap_content"
- android:text="execute"/>
- <Button
- android:id="@+id/cancel"
- android:layout_width="fill_parent"
- android:layout_height="wrap_content"
- android:enabled="false"
- android:text="cancel"/>
- <ProgressBar
- android:id="@+id/progress_bar"
- android:layout_width="fill_parent"
- android:layout_height="wrap_content"
- android:progress="0"
- android:max="100"
- style="?android:attr/progressBarStyleHorizontal"/>
- <ScrollView
- android:layout_width="fill_parent"
- android:layout_height="wrap_content">
- <TextView
- android:id="@+id/text_view"
- android:layout_width="fill_parent"
- android:layout_height="wrap_content"/>
- </ScrollView>
- </LinearLayout>
因为需要访问网络,所以我们还需要在AndroidManifest.xml中加入访问网络的权限:
- <uses-permission android:name="android.permission.INTERNET"/>
我们来看一下运行时的界面:
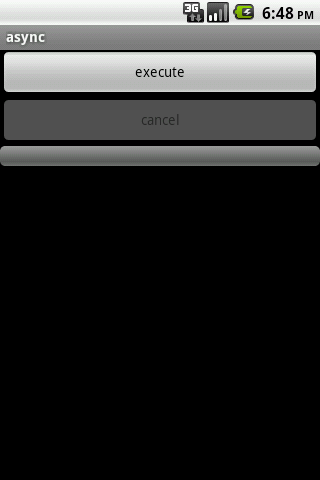
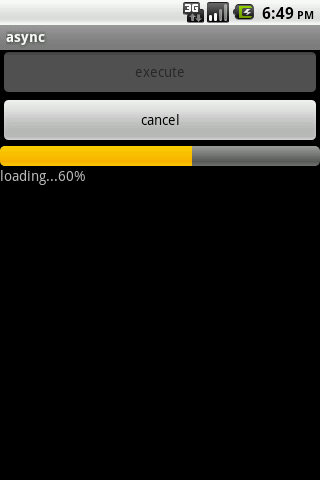
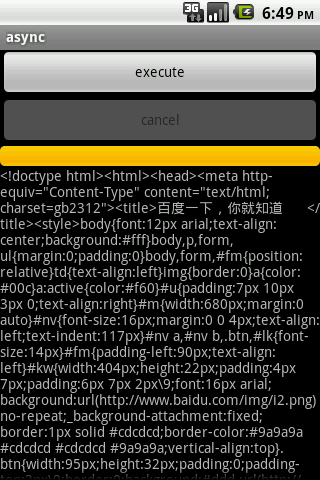
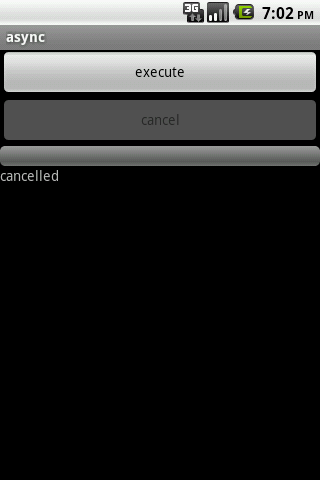
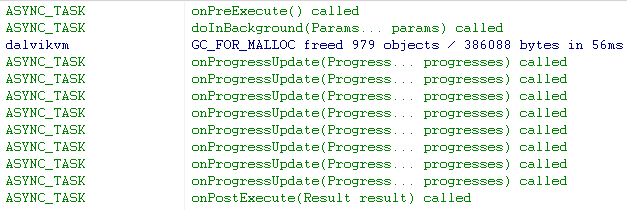
以上几个截图分别是初始界面、执行异步任务时界面、执行成功后界面、取消任务后界面。执行成功后,整个过程日志打印如下:
如果我们在执行任务时按下了“cancel”按钮,日志打印如下:
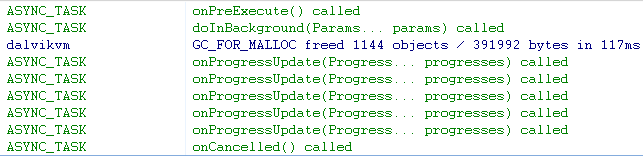
可以看到onCancelled()方法将会被调用,onPostExecute(Result result)方法将不再被调用。
二、 AsyncTask的实现基本原理
上面介绍了AsyncTask的基本应用,有些朋友也许会有疑惑,AsyncTask内部是怎么执行的呢,它执行的过程跟我们使用Handler又有什么区别呢?答案是:AsyncTask是对Thread+Handler良好的封装,在android.os.AsyncTask代码里仍然可以看到Thread和Handler的踪迹。下面就向大家详细介绍一下AsyncTask的执行原理。
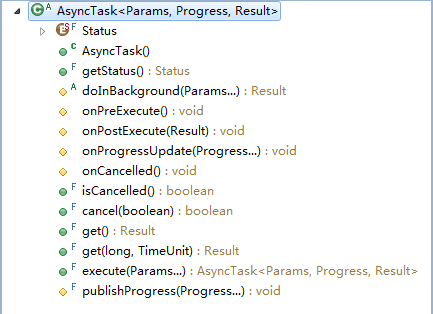
我们先看一下AsyncTask的大纲视图:
源代码如下 :
 /**
     * Override this method to perform a computation on a background thread. The
     * specified parameters are the parameters passed to {@link #execute}
     * by the caller of this task.
     *
     * This method can call {@link #publishProgress} to publish updates
     * on the UI thread.
     *
     * @param params The parameters of the task.
     *
     * @return A result, defined by the subclass of this task.
     *  这是一个abstract 方法,因此必须覆写。
     * @see #onPreExecute()
     * @see #onPostExecute
     * @see #publishProgress
     */
    protected abstract Result doInBackground(Params... params);

    /**
     * Runs on the UI thread before {@link #doInBackground}.
     *
     * @see #onPostExecute
     * @see #doInBackground
     */
    protected void onPreExecute() {
    }

    /**
     * Runs on the UI thread after {@link #doInBackground}. The
     * specified result is the value returned by {@link #doInBackground}
     * or null if the task was cancelled or an exception occured.
     *后台操作执行完后会调用的方法,在此更新UI。
     * @param result The result of the operation computed by {@link #doInBackground}.
     *
     * @see #onPreExecute
     * @see #doInBackground
     */
    @SuppressWarnings({"UnusedDeclaration"})
    protected void onPostExecute(Result result) {
    }

    /**
     * Runs on the UI thread after {@link #publishProgress} is invoked.
     * The specified values are the values passed to {@link #publishProgress}.
     *
     * @param values The values indicating progress.
     * 传值更新进度条
     * @see #publishProgress
     * @see #doInBackground
     */
    @SuppressWarnings({"UnusedDeclaration"})
    protected void onProgressUpdate(Progress... values) {
    }

   /**
     * Executes the task with the specified parameters. The task returns
     * itself (this) so that the caller can keep a reference to it.
     *
     * This method must be invoked on the UI thread.   注意execute方法必须在UI线程中调用
     *
     * @param params The parameters of the task.
     *
     * @return This instance of AsyncTask.
     *
     * @throws IllegalStateException If {@link #getStatus()} returns either
     *         {@link AsyncTask.Status#RUNNING} or {@link AsyncTask.Status#FINISHED}.
     */
    public final AsyncTask<Params, Progress, Result> execute(Params... params) {
        if (mStatus != Status.PENDING) {
		// 状态检测,只有在PENDING状态下才能正常运行,构造抛出异常
            switch (mStatus) {
                case RUNNING:
                    throw new IllegalStateException("Cannot execute task:"
                            + " the task is already running.");
                case FINISHED:
                    throw new IllegalStateException("Cannot execute task:"
                            + " the task has already been executed "
                            + "(a task can be executed only once)");
            }
        }

        mStatus = Status.RUNNING;
	// 正在执行任务前的准备处理
        onPreExecute();
	// 获得从UI现存传递来的参数
        mWorker.mParams = params;
	// 交给线程池管理器进行调度,参数为FutureTask类型,构造mFuture时mWorker被传递了进去,后边会继续分析
        sExecutor.execute(mFuture);
	// 返回自身,使得调用者可以保持一个引用
        return this;
    }

    /**
     * This method can be invoked from {@link #doInBackground} to
     * publish updates on the UI thread while the background computation is
     * still running. Each call to this method will trigger the execution of
     * {@link #onProgressUpdate} on the UI thread.
     *
     * @param values The progress values to update the UI with.
     *
     * @see #onProgressUpdate
     * @see #doInBackground
     */
    protected final void publishProgress(Progress... values) {
        sHandler.obtainMessage(MESSAGE_POST_PROGRESS,
                new AsyncTaskResult<Progress>(this, values)).sendToTarget();
    }
我们可以看到关键几个步骤的方法都在其中。
1、doInBackground(Params... params)是一个抽象方法,我们继承AsyncTask时必须覆写此方法;
2、onPreExecute()、onProgressUpdate(Progress... values)、onPostExecute(Result result)、onCancelled()这几个方法体都是空的,我们需要的时候可以选择性的覆写它们;
3、publishProgress(Progress... values)是final修饰的,不能覆写,只能去调用,我们一般会在doInBackground(Params... params)中调用此方法来更新进度条;
4、另外,我们可以看到有一个Status的枚举类和getStatus()方法,Status枚举类代码段如下:
- //初始状态
- private volatile Status mStatus = Status.PENDING;
- public enum Status {
- /**
- * Indicates that the task has not been executed yet.
- */
- PENDING,
- /**
- * Indicates that the task is running.
- */
- RUNNING,
- /**
- * Indicates that {@link AsyncTask#onPostExecute} has finished.
- */
- FINISHED,
- }
- /**
- * Returns the current status of this task.
- *
- * @return The current status.
- */
- public final Status getStatus() {
- return mStatus;
- }
可以看到,AsyncTask的初始状态为PENDING,代表待定状态,RUNNING代表执行状态,FINISHED代表结束状态,这几种状态在AsyncTask一次生命周期内的很多地方被使用,非常重要。
在execute函数中涉及到三个陌生的变量:mWorker、sExecutor、mFuture,我们也会看一下他们的庐山真面目:
关于sExecutor,它是java.util.concurrent.ThreadPoolExecutor的实例,用于管理线程的执行。代码如下:
- private static final int CORE_POOL_SIZE = 5;
- private static final int MAXIMUM_POOL_SIZE = 128;
- private static final int KEEP_ALIVE = 10;
- //新建一个队列用来存放线程
- private static final BlockingQueue<Runnable> sWorkQueue =
- new LinkedBlockingQueue<Runnable>(10);
- //新建一个线程工厂
- private static final ThreadFactory sThreadFactory = new ThreadFactory() {
- private final AtomicInteger mCount = new AtomicInteger(1);
- //新建一个线程
- public Thread newThread(Runnable r) {
- return new Thread(r, "AsyncTask #" + mCount.getAndIncrement());
- }
- };
- //新建一个线程池执行器,用于管理线程的执行
- private static final ThreadPoolExecutor sExecutor = new ThreadPoolExecutor(CORE_POOL_SIZE,
- MAXIMUM_POOL_SIZE, KEEP_ALIVE, TimeUnit.SECONDS, sWorkQueue, sThreadFactory);
mWorker实际上是AsyncTask的一个的抽象内部类的实现对象实例,它实现了Callable<Result>接口中的call()方法,代码如下:
- private static abstract class WorkerRunnable<Params, Result> implements Callable<Result> {
- Params[] mParams;
- }
而mFuture实际上是java.util.concurrent.FutureTask的实例,下面是它的FutureTask类的相关信息:
- /**
- * A cancellable asynchronous computation.
- * ...
- */
- public class FutureTask<V> implements RunnableFuture<V> {
- public interface RunnableFuture<V> extends Runnable, Future<V> {
- /**
- * Sets this Future to the result of its computation
- * unless it has been cancelled.
- */
- void run();
- }
可以看到FutureTask是一个可以中途取消的用于异步计算的类。
下面是mWorker和mFuture实例在AsyncTask中的体现:
private final WorkerRunnable<Params, Result> mWorker;
   private final FutureTask<Result> mFuture;

public AsyncTask() {
       mWorker = new WorkerRunnable<Params, Result>() {
           //call方法被调用后,将设置优先级为后台级别, 然后调用AsyncTask的doInBackground方法
        public Result call() throws Exception {
               Process.setThreadPriority(Process.THREAD_PRIORITY_BACKGROUND);
               return doInBackground(mParams);
           }
       };

    // 在mFuture实例中,将会调用mWorker做后台任务,完成后会调用done方法。
    // 这里将mWorker作为参数传递给了mFuture对象
       mFuture = new FutureTask<Result>(mWorker) {
           @Override
           protected void done() {
               Message message;
               Result result = null;

               try {
                   result = get();
               } catch (InterruptedException e) {
                   android.util.Log.w(LOG_TAG, e);
               } catch (ExecutionException e) {
                   throw new RuntimeException("An error occured while executing doInBackground()",
                           e.getCause());
               } catch (CancellationException e) {
                //发送取消任务的消息
                   message = sHandler.obtainMessage(MESSAGE_POST_CANCEL,
                           new AsyncTaskResult<Result>(AsyncTask.this, (Result[]) null));
                   message.sendToTarget();
                   return;
               } catch (Throwable t) {
                   throw new RuntimeException("An error occured while executing "
                           + "doInBackground()", t);
               }

            //发送显示结果的消息
               message = sHandler.obtainMessage(MESSAGE_POST_RESULT,
                       new AsyncTaskResult<Result>(AsyncTask.this, result));
               message.sendToTarget();
           }
       };
   }
我们看到上面的代码中,mFuture实例对象的done()方法中,如果捕捉到了CancellationException类型的异常,则发送一条“MESSAGE_POST_CANCEL”的消息;如果顺利执行,则发送一条“MESSAGE_POST_RESULT”的消息,而消息都与一个sHandler对象关联。
我们继续按着执行流程跟踪代码,
	// 正在执行任务前的准备处理
        onPreExecute();
	// 获得从UI现存传递来的参数
        mWorker.mParams = params;
	// 交给线程池管理器进行调度,参数为FutureTask类型,构造mFuture时mWorker被传递了进去,后边会继续分析
        sExecutor.execute(mFuture);
   public void execute(Runnable command) {
        if (command == null)
            throw new NullPointerException();
        /*
         * Proceed in 3 steps:
         *
         * 1. If fewer than corePoolSize threads are running, try to
         * start a new thread with the given command as its first
         * task.  The call to addWorker atomically checks runState and
         * workerCount, and so prevents false alarms that would add
         * threads when it shouldn't, by returning false.
         *
         * 2. If a task can be successfully queued, then we still need
         * to double-check whether we should have added a thread
         * (because existing ones died since last checking) or that
         * the pool shut down since entry into this method. So we
         * recheck state and if necessary roll back the enqueuing if
         * stopped, or start a new thread if there are none.
         *
         * 3. If we cannot queue task, then we try to add a new
         * thread.  If it fails, we know we are shut down or saturated
         * and so reject the task.
         */
        int c = ctl.get();
        if (workerCountOf(c) < corePoolSize) {
            if (addWorker(command, true))
                return;
            c = ctl.get();
        }
        if (isRunning(c) && workQueue.offer(command)) {
            int recheck = ctl.get();
            if (! isRunning(recheck) && remove(command))
                reject(command);
            else if (workerCountOf(recheck) == 0)
                addWorker(null, false);
        }
        else if (!addWorker(command, false))
            reject(command);
}private boolean addWorker(Runnable firstTask, boolean core) {
retry:
for (;;) {
int c = ctl.get();
int rs = runStateOf(c);
// Check if queue empty only if necessary.
if (rs >= SHUTDOWN &&
! (rs == SHUTDOWN &&
firstTask == null &&
! workQueue.isEmpty()))
return false;
for (;;) {
int wc = workerCountOf(c);
if (wc >= CAPACITY ||
wc >= (core ? corePoolSize : maximumPoolSize))
return false;
if (compareAndIncrementWorkerCount(c))
break retry;
c = ctl.get(); // Re-read ctl
if (runStateOf(c) != rs)
continue retry;
// else CAS failed due to workerCount change; retry inner loop
}
}
// 这里又生成了一个Worker的对象,将异步任务传递给了w
Worker w = new Worker(firstTask);
Thread t = w.thread;
...... // 后续代码省略
wokers.add( w );// 将w添加到了wokers里,这是一个HashSet集合对象
......
w.start(); // 启动该异步任务,即启动了mFuture任务。
......
return true;
}由于mFuture是FutureTask类型,因此继续跟踪到FutureTask的代码。可以看到该构造函数,即上文中构造mFuture时用的构造函数,参数我们传递的是mWorker。
    public FutureTask(Callable<V> callable) {
        if (callable == null)
            throw new NullPointerException();
        sync = new Sync(callable);
}而启动mFuture时就会执行其中的run函数,如下 :
  public void run() {
        sync.innerRun();
    }
可知,实际上调用的是Sync的innerRun()函数,我们继续查看Sync类型。
     private volatile Thread runner;
	// 构造函数,传递进来的就是最先说的那个mWorker
        Sync(Callable<V> callable) {
            this.callable = callable;
        }

        ......				// 部分代码省略
        // innerRun函数
        void innerRun() {
            if (!compareAndSetState(READY, RUNNING))
                return;

            runner = Thread.currentThread();
            if (getState() == RUNNING) { // recheck after setting thread
                V result;
                try {
                    // 可以发现调用的是callable的.call()函数,即mWorker的call函数,而在mWorker的call函数中才真正的调用了doInBackground函数,至此线程真正启动了!
                    result = callable.call();
                } catch (Throwable ex) {
                    setException(ex);
                    return;
                }
                set(result);
            } else {
                releaseShared(0); // cancel
            }
        }
我们看到,最后调用了set(result);我们看看这段代码 :
   protected void set(V v) {
        sync.innerSet(v);
} void innerSet(V v) {
for (;;) {
int s = getState();
if (s == RAN)
return;
if (s == CANCELLED) {
// aggressively release to set runner to null,
// in case we are racing with a cancel request
// that will try to interrupt runner
releaseShared(0);
return;
}
if (compareAndSetState(s, RAN)) {
result = v;
releaseShared(0);
done(); // 调用了done方法
return;
}
}
}再来分析AsyncTask中的sHandler。这个sHandler实例实际上是AsyncTask内部类InternalHandler的实例,而InternalHandler正是继承了Handler,下面我们来分析一下它的代码:
- private static final int MESSAGE_POST_RESULT = 0x1; //显示结果
- private static final int MESSAGE_POST_PROGRESS = 0x2; //更新进度
- private static final int MESSAGE_POST_CANCEL = 0x3; //取消任务
- private static final InternalHandler sHandler = new InternalHandler();
- private static class InternalHandler extends Handler {
- @SuppressWarnings({"unchecked", "RawUseOfParameterizedType"})
- @Override
- public void handleMessage(Message msg) {
- AsyncTaskResult result = (AsyncTaskResult) msg.obj;
- switch (msg.what) {
- case MESSAGE_POST_RESULT:
- // There is only one result
- //调用AsyncTask.finish方法
- result.mTask.finish(result.mData[0]);
- break;
- case MESSAGE_POST_PROGRESS:
- //调用AsyncTask.onProgressUpdate方法
- result.mTask.onProgressUpdate(result.mData);
- break;
- case MESSAGE_POST_CANCEL:
- //调用AsyncTask.onCancelled方法
- result.mTask.onCancelled();
- break;
- }
- }
- }
我们看到,在处理消息时,遇到“MESSAGE_POST_RESULT”时,它会调用AsyncTask中的finish()方法,我们来看一下finish()方法的定义:
- private void finish(Result result) {
- if (isCancelled()) result = null;
- onPostExecute(result); //调用onPostExecute显示结果
- mStatus = Status.FINISHED; //改变状态为FINISHED
- }
原来finish()方法是负责调用onPostExecute(Result result)方法显示结果并改变任务状态的啊。
另外,在mFuture对象的done()方法里,构建一个消息时,这个消息包含了一个AsyncTaskResult类型的对象,然后在sHandler实例对象的handleMessage(Message msg)方法里,使用下面这种方式取得消息中附带的对象:
- AsyncTaskResult result = (AsyncTaskResult) msg.obj;
这个AsyncTaskResult究竟是什么呢,它又包含什么内容呢?其实它也是AsyncTask的一个内部类,是用来包装执行结果的一个类,让我们来看一下它的代码结构:
- @SuppressWarnings({"RawUseOfParameterizedType"})
- private static class AsyncTaskResult<Data> {
- final AsyncTask mTask;
- final Data[] mData;
- AsyncTaskResult(AsyncTask task, Data... data) {
- mTask = task;
- mData = data;
- }
- }
看以看到这个AsyncTaskResult封装了一个AsyncTask的实例和某种类型的数据集,我们再来看一下构建消息时的代码:
- //发送取消任务的消息
- message = sHandler.obtainMessage(MESSAGE_POST_CANCEL,
- new AsyncTaskResult<Result>(AsyncTask.this, (Result[]) null));
- message.sendToTarget();
- //发送显示结果的消息
- message = sHandler.obtainMessage(MESSAGE_POST_RESULT,
- new AsyncTaskResult<Result>(AsyncTask.this, result));
- message.sendToTarget();
在处理消息时是如何使用这个对象呢,我们再来看一下:
- result.mTask.finish(result.mData[0]);
- result.mTask.onProgressUpdate(result.mData);
概括来说,当我们调用execute(Params... params)方法后,execute方法会调用onPreExecute()方法,然后由ThreadPoolExecutor实例sExecutor执行一个FutureTask任务,这个过程中doInBackground(Params... params)将被调用,如果被开发者覆写的doInBackground(Params... params)方法中调用了publishProgress(Progress... values)方法,则通过InternalHandler实例sHandler发送一条MESSAGE_POST_PROGRESS消息,更新进度,sHandler处理消息时onProgressUpdate(Progress... values)方法将被调用;如果遇到异常,则发送一条MESSAGE_POST_CANCEL的消息,取消任务,sHandler处理消息时onCancelled()方法将被调用;如果执行成功,则发送一条MESSAGE_POST_RESULT的消息,显示结果,sHandler处理消息时onPostExecute(Result result)方法被调用。
经过上面的介绍,相信朋友们都已经认识到AsyncTask的本质了,它对Thread+Handler的良好封装,减少了开发者处理问题的复杂度,提高了开发效率,希望朋友们能多多体会一下。


 846
846


 被折叠的 条评论
为什么被折叠?
被折叠的 条评论
为什么被折叠?
 到【灌水乐园】发言


