Return to the Table of Contents
To help readers of Foundations of Python Network Programming who want to explore client and server programming on a network where they have complete control and can capture packets wherever they wish, I have created 5 Docker images together with a script that configures them as a 12-machine network that roughly resembles the Internet in miniature.
-
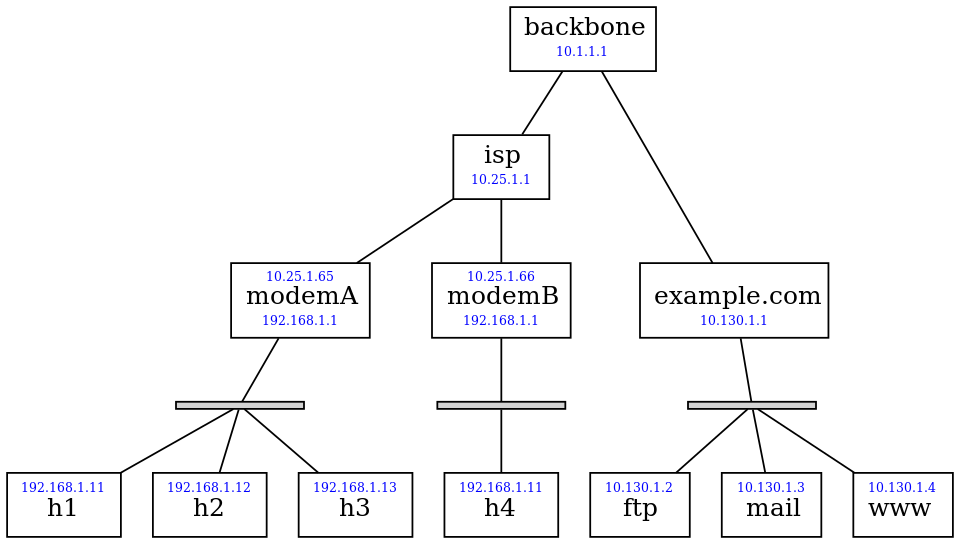
Four hosts
h1,h2,h3, andh4represent the machines you might use at home or in a coffee shop. -
The hosts live behind
modemAandmodemBthat do network address translation (NAT) so that only outbound connections can be made to the rest of the network. -
The modems connect to the rest of the world through routers
ispandbackbone. -
On the other side of the world is the
example.commachine room whose gateway namedexampleserves three machinesftp,mail, andwww. These servers can be reached either using the short version of their name likeftpor a fully qualified name likeftp.example.com.
The network services running on the machines are:
- On every host
- SSH — port 22
backbone- DNS — port 53
ftp.example.com- FTP — port 21
- Telnet — port 23
mail.example.com- SMTP — port 25
- POP3 — port 110
- POP3S — port 995
- IMAP — port 143
- IMAPS — port 993
www.example.com- HTTP — port 80
- HTTPS — port 443
You can verify that these ports are open by connecting to them
individually or else by running nmap — which is available on every
machine in the network — against one of the other hosts.
The network playground is a Vagrant box that, after you have Vagrant installed and running on your platform, you can download and run by typing:
vagrant init brandon-rhodes/playground
vagrant up --provider virtualbox
vagrant ssh
Note that you will need both Vagrant and VirtualBox installed, and that only versions of Vagrant 1.7.3 or later can support the new 5.x version of VirtualBox — so if your Vagrant version is a bit behind, then be sure to install a 4.x VirtualBox instead of the latest version.
If you want a bit of explanation about to what is happening during each of the above commands, a user has written up some notes here: #16 (comment)
Once you are inside of the Vagrant image, which is an Ubuntu 14.04 LTS
system with Docker installed, you can start up the playground and
connect to any of the four machines h1 through h4 to start
exploring:
vagrant@vagrant-ubuntu-vivid-64:~$ ./launch.sh
vagrant@vagrant-ubuntu-vivid-64:~$ ssh h1

root@h1:~# traceroute www.example.com

traceroute to www.example.com (10.130.1.4), 30 hops max, 60 byte packets
 1  192.168.1.1 (192.168.1.1)  0.294 ms  0.167 ms  0.183 ms
 2  isp (10.25.1.1)  1.002 ms  0.220 ms  0.218 ms
 3  backbone (10.1.1.1)  0.358 ms  0.259 ms  0.256 ms
 4  example.com (10.130.1.1)  0.500 ms  0.286 ms  0.355 ms
 5  www.example.com (10.130.1.4)  0.722 ms  0.662 ms  0.475 ms

root@h1:~# ping -c1 www.example.com

64 bytes from www.example.com (10.130.1.4): icmp_seq=1 ttl=60 time=1.17 ms

root@h1:~# nmap mail.example.com

Nmap scan report for mail.example.com (10.130.1.3)
Host is up (0.000027s latency).
Not shown: 994 closed ports
PORT    STATE SERVICE
22/tcp  open  ssh
25/tcp  open  smtp
110/tcp open  pop3
143/tcp open  imap
993/tcp open  imaps
995/tcp open  pop3s

Nmap done: 1 IP address (1 host up) scanned in 1.72 seconds

root@h1:~# ssh www

Welcome to Ubuntu 14.04 LTS (GNU/Linux 3.19.0-25-generic x86_64)

root@www:~# route -n

Kernel IP routing table
Destination     Gateway         Genmask         Flags Metric Ref    Use Iface
0.0.0.0         10.130.1.1      0.0.0.0         UG    0      0        0 eth0
10.130.1.0      0.0.0.0         255.255.255.0   U     0      0        0 eth0
All of the hosts in the playground should have the Foundations of
Python Network Programming repository mounted under “/fopnp” and should
allow you to login as either the user brandon or root with either
SSH keys or the password abc123.
If you want to build the playground yourself instead of using the pre-packaged virtual machine image:
-
Log in to an existing 64-bit Linux machine, or else install one inside of a vitalization tool like VirtualBox. Install both Docker and the
gitversion control command. If instead of a general-purpose Linux like Ubuntu Server you use boot2docker, then Docker will already be up and running once you boot andgitwill already be installed. -
Add your user to the
dockergroup so you have permission to create and configure Docker containers.$ sudo adduser your_own_username docker -
Use
gitto check out thefopnprepository from GitHub:$ git clone https://github.com/brandon-rhodes/fopnp.git $ cd fopnp/playground -
Build the five Docker images. You will need
sudoaccess to the root account to perform this step as well as the following step, because they involve creating and configuring network interfaces.$ ./build.sh -
Start the images and configure the network fabric between them. This script is currently designed for use on boot2docker, and might require adjustment before it will run under another distribution.
$ ./launch.sh
Once the above steps are completed, you should be able to get a root
prompt on any of the machines by making an SSH connection to any of the
machines h1, h2, h3, or h4. Be sure to use the provided SSH
configuration file, that defines those four hostnames and authenticates
the login using the correct private key:
$ ssh -F ssh-config h1

root@h1:/# pwd
/

root@h1:/# traceroute www.example.com
traceroute to www.example.com (10.130.1.4), 30 hops max, 60 byte packets
 1  192.168.1.1 (192.168.1.1)  0.294 ms  0.167 ms  0.183 ms
 2  isp (10.25.1.1)  1.002 ms  0.220 ms  0.218 ms
 3  backbone (10.1.1.1)  0.358 ms  0.259 ms  0.256 ms
 4  example.com (10.130.1.1)  0.500 ms  0.286 ms  0.355 ms
 5  www.example.com (10.130.1.4)  0.722 ms  0.662 ms  0.475 ms
If you get an error no such identity that complains No such file or directory, then edit the ssh-config file to make the IdentityFile
path reflect the exactly location of the playground/base/id_rsa file
on your particular system.