


Closure是一套开发富客户端的javascript工具。其中每一个工具都是在Apache 2.0 license下开源的,并且由google开发,维护。Closure已经被google开发了许多web应用,包括Gmail,Google Maps, Google Docs. 这些应用的性能就是Closure工具集的证明。
一些开发者可能在他们的web应用中都在回避扩展javascript的想法。为什么这些代码只是依赖于全局变量而不是支持命名空间来实现更大更复杂的功能?一些人可能指出说,google已经在GWT中已经支持了,因此他们自己根本就没有必要在javascript中关心这些。为什么我们在已经有这工具的情况下还要一新的工具呢?
不管你喜欢不喜欢,javascript都是web中的通用语言。尽管像GWT这样的工具是对javascript一定程度的抽象,但他仍然是建立在你和浏览器之间的。与其像这样围绕javascript来发明一些工具,为什么不从问题产生的源头来构建一些工具呢?
这就是Closure产生的原因:这个工具使维护一具巨大的javascript代码库更容易。Closure本质上是扩展了javascript,并引入了其它语言的一些功能,比如 命名空间,类型检查和数据隐藏。此外,它实现这些功能不是发生在运行时的。更重要的是它并没有牺牲Javascript本生比较优秀而其它语言如java不支持的部分,这种javascript的语言转换必须好用并且具有产品级质量。
使用Closure不单能使你的部门领导高兴,而且能使你的用户开心。作为这个工具集的一颗宝石,Closure编译器工具能大大减少用户下载javascript的数量。它是通过将长变量明替换为更短的名字,移除无用的代码,并且应用了很多其它的优化。压缩代码不光能使你的应用更快,还能减少网络流量使用户节省带宽花费。更深一层上讲,混淆代码将能保护你的代码,因为这能使别的网站复制你的功能更困难。
工具预览
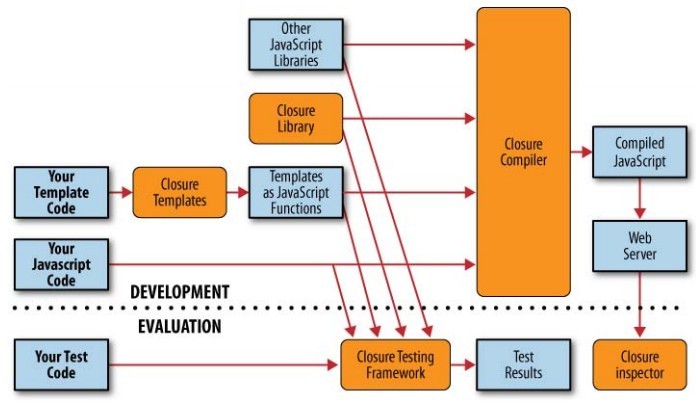
除了Closure编译器,在Closure工具集中还有其它4种工具可用。下图显示了使用这些工具的一些通用流程。这一节将要对这些工具作一些大概描述。
Closure Library工具
Closure library是一个完全的javascript库,就像jquery,dojo,和mootools一样。它的代码风格是按照Closure编译器订制的。这使得它成为和别的javascript库相区别的特点。并使用压缩后的代码比YUI工具压缩后的小85%。
Closure library实现时也着重于性能和可读性方面的设计。各种对象都相当简洁,并且有大量文档说明。它也支持一个很强大的事件系统,支持继承,并广播到各种UI组件,包括富文本框。Closure Library代码也通过了多种浏览器的测试,并且也支持非浏览器环境,如果Rhino和Microsoft Windows Scripts Host。因为这个库是google工程师们先用使用后开源的 ,因此在google产品它的每一生代码都是安全的。这个库的写法将在第二章介绍,功能将在接下来的8章中详细介绍。
Closure Templates
Closure Templates提供创建生成HTML对象的Javascript方法或对象。这使得创建巨大的Hmtl串去构建DOM对象。不幸的是大多数程序语言都不是原生支持模板语言。因此一些web框架都将这部分独立出来(如J2ee有JSP, Python使用Django的模板系统等等)。Closure Templates也是这样的模板,它能编译成java和javascript,因此能够将其运行在服务器上和客户端上。使用Closure Templates的好处将在第11章介绍。
Closure Compiler
Closure Compiler是一个javascript优化工具,它通过输入原代码并且输出相同的原代码。那就是说在使用输入的原代码的地方都可以用输入的代码替换。下面给出一个例子:输入代码是这样的:
- /**
- * @param{string}name
- **/
- var hello = function(name){
- alert('hello, '+name);
- };
- hello('New usefr');
然后编译将会产生出如下相同的代码:
- alert('Hello, New user');
执行这两段代码都会是同样的效果:弹出框中显示文本: “Hello, New user”.但第二段代码更简明,因此它比第一段代码能更地下载并解释执行。
此外,编译器也能在编译时找出一些大类中的错误,就像JSLint工具一样。这能帮助我们更容易地找出bug,提升开发效率。使用编译器找出问题不是用来替代单元测试,它只是提供一些帮助。对于已经存在的javascript应用,Closure Compiler是一个很有用的工具。编译使用Closure Library样式写的代码更有效。如果将这依赖jquery或dojo的地方换成这个库将要花很长时间。同时,Closure Compileer能够轻松使用在用YUI或JSMin压缩过的代码中。编译器将在第十二章介绍。
Closure Testing Framework
closure testing framework是一个运行在浏览器上的单元测试框,就像JsUnit一样。大多数Closure library代码都通过了这个框架的测试。对你的代码创建单元测试并定期测试是一个很好的习惯。因为这个框架是运行在浏览器上的,因此你必须要有一浏览器来显示记录测试结果。这个框架将在15章中介绍。
Closure Inspector
Closure Inspector是一个对Firebug的扩展,用来编译后的javascript,Firebug是Firefox的扩展。包括很多开发工具,包括Javascript调试器,用于浏览器中的调试。但是用firebugy调试器调试Closure compiler处理后的模糊代码时,很难跟踪到出错时的正确问题。Closure Inspector 用来在Firebug 界面中显示原始代码后编译后代码的对应关系。这个工具将在第十六章中详细介绍。
Closure工具设计目标和原理
在深入代码之前,应该先了解这个工具集设计的目标和动机。这些工具设计的动力大多产生于编译器的closure library的语法样式。
减小编译后的代码是最重要的
closure编译最主要的目标是减小javascript代码的大小。因为google有很多javascript开发的网页并以速度优势而自豪,因此就要求以竟可能小的方法来显示一个页面。即使是浏览器会缓存页面,它仍然会在用户重新加载时再次解释执行。javascript代码越小,它花费的时间就越少。
特别地,编译器支持用gzip的方法来减小javascript大小。在编译前会重写一些函数。比如:
- Line.prototype.translate = function(distance) {
- this.x1 += distance;
- this.y1 += distance;
- this.x2 += distance;
- this.y2 += distance;
- };
- Line.prototype.translate = function(distance) {
- var me = this;
- me.x1 += distance;
- me.y1 += distance;
- me.x2 += distance;
- me.y2 += distance;
- };
Javascript应该以更有利于编译器编译的方式书写。这对理解Closure Library设计目标很有用:它冗长的代码并不是处理后的大小。编译器将会移除无用的部分。相似的方法将会被替换单一方法(如enable()和disable()换成setEnabled(enable) )。这会减少方法声明数量,因此为了深入理解Closure库,必须我解编译器是怎么重写javascript代码的。
可能有人会问减小大小 不是为了更好的性能,简短回答是:是,由于运行时性能比代码大小玩难测试,所以更多时间都用来减小大小。幸运的是,减小大小能提高性能。因此大多数优化都是在编译而不是运行时。
所有源代码编译到一起
编译器用来将所有代码编译到一起。就如前面所讲,输入里会有很多不同来源的代码,但是编译器只接收一次。这是和其它语言不同的地方,其它语言将代码编译成可重用的模块。Closure与其相反,它将代码编译到一起然后分成不同模块。并由应用逐步加载。这要求各种独立的模块的名字是唯一的。
内存管理
就像Gmail团队在他们博客上说明的那样,他们在IE6上遇到一个性能问题,会阻止用户获取新版本的Gmail,尽管这使Gmail工程师头痛了很久,这也使得他们在客户端上的内存管理做了更多努力。
就像大多数现在编程语言一样,Javascript自己管理内存。不幸的是,这不能摆脱内存泄露,由不能及时释放不再引用的对象仍然会引起内存不足。Closure Library使用goog.Disposable释放对象来让这些垃圾对象对回收。这个方法将在第5章介绍,相关的事件监听将在第6章介绍。
IE6的垃圾回收问题goog.structs.Map中更严重,这在其原代码中有详细说明
- **
- * An array of keys. This is necessary for two reasons:
- * 1. Iterating the keys using for (var key in this.map_) allocates an
- * object for every key in IE which is really bad for IE6 GC perf.
- * 2. Without a side data structure, we would need to escape all the keys
- * as that would be the only way we could tell during iteration if the
- * key was an internal key or a property of the object.
- *
- * This array can contain deleted keys so it's necessary to check the map
- * as well to see if the key is still in the map (this doesn't require a
- * memory allocation in IE).
- * @type {!Array.<string>}
- * @private
- */
- this.keys_ = [];
尽可能在编译时发现错误
Closure编译器不是一个个在编译时通过静态检查来发现问题的工具,但是这会受到能获取多少独立源码的限制。为了让代码自己支持这些信息,编译使用一种出现在javascript注释中的开发注解来实现。这注解将在第2章中详细介绍。
通过注释函数的参数和返回类型,编译器能够判断传给方法的参数类型,同样的,注释一个变量是私有的,编译器会判断此变量能不能被访问。通过你代码中加入注释,会提高你代码的正确性。
未编译代码必须能执行
尽管编译器对输入进行了很多有用的转换,Closure Library也能够在未编译时正确编译。这不仅使输入语言是纯javascript,也 高度更容易,
代码必须跨浏览器
Closure Library设计为跨浏览器,也能运行在非浏览器环境。
并不是说Closure Library缺乏像DOM这样的API,相反,这个库提供了很多在浏览器中工作的方法。他在所有Javascript中以对象形式存在,这也使得这些API不仅参在浏览器运行。这也使得这个库成为一服务器端javascript库。
内置类型不能被修改
内置对象,像Object, Function, Array,和String不能被修改。这使得Closure和其它javascript库共存成为可能。但是,Closure和其它库共存是个不好的选择。因为每个库都有自己的逻辑和运行环境,那就意味着将会导入很多相同的功能 。
代码必须跨Frame工作
Closure Library设计为每个frameset只加载一次。像Array这样的内置对象,可以在不同的frame中构造,因此会有不同的原型。对于多frame应用,只加载一次库而不是每个frame加载一次。
工具应该是独立的
Closure工具集中每一个工具能够独立使用。这很大原因是因为这些不同工具是google不同团队独立开发的。因此不能保证使用编译器的团队也使用library.现在库已经很成熟了。现在使用一个工具而不是另一个的原因是一些遗留代码对一些工具的依赖。当你决定将Closure整合到一个项目时也会遇到同样的问题。
你虽然能通过这个编译器编译jquery,或者使用Templates来创建功能。尽管Library和编译能独立使用。一些情况下,Library在没有编译器下是完全不可用的。
下载和安装工具
现在Closure工具集中的每个工具都是独立下载和安装的。由于工具都是相互依赖的,每个都作为独立项目在code.google.com中存在。大多数项目都会有功能下载区域,其中有文档和zip文件包的下载。但是Closure Library没有提供下载。只能从svn上找到这个项目。
Closure Library 和Closure测试框架
就像上面提到的,Closure Library不能直接通过zip文件下载。因此必须从svn上下载,apple和linux用户可以通过如下命令:
- mkdir ~/closure
- cd ~/closure
- svn checkout http://closure-library.googlecode.com/svn/trunk/ closure-library
Closure Templates
Closure Templates二进制包用来将template编译成javascript, 下载地址:http://closure-templates.googlecode.com/files/closure-templates-for-javascript-latest.zip.直接从原代码编译这个工具也很简单,首先从http://closure-templates.googlecode.com/svn/trunk/下载原码,然后运行如下命令:
- cd ~/closure/closure-templates/
- ant SoyToJsSrcCompiler
Closure 编译器
最简单方法是下载zip文件: http://closure-compiler.googlecode.com/files/compiler-latest.zip,如果要从源代码编译,先下载: http://closure-compiler.googlecode.com/svn/trunk/
- cd ~/closure/closure-compiler/
- ant jar
Closure Inspector
closure inspector是一个firefox扩展,下载地址: http://code.google.com/p/closure-inspector/downloads/detail?name=closureinspector095.xpi
例子:Hello World
这节将通过一个简单的例子来讲述所有Closure工具的使用。在作这个练习之前,首先确保前面提到的所有工具都安装完成。包括java 6和python2.6.5或更新。并保证命令行可用。
Closure Libray
第一步将要练习Closure Library创建页面并加载Library核心。然后通过DOM工具插入文字:Hello World!到页面中。假如你已经有了前面提到的工具,首先在closure目录中创建一个子目录:hello-world。然后创建一个hello.js文件放入 hello-world中,hello.js内容如下:
- goog.provide('example');
- goog.require('goog.dom');
- example.sayHello = function(message){
- goog.dom.getElement('hello').innerHtml = message;
- };
- <!doctype html>
- <html>
- <head>
- <title>Example: Hello World</title>
- </head>
- <body>
- <div id="hello"></div>
- <script src="../closure-library/closure/goog/base.js"></script>
- <script src="hello.js"></script>
- <script>
- example.sayHello('Hello World!');
- </script>
- </body>
- </html>
Closure Templates
尽管“Hello World!”是一个经典的例子,也相当无聊,因此Closure Template能够用更友好的方式插入html到页面中,在hello-world上当下创建hello.soy文件:
- {namespace example.templates}
- /**
- * @param greeting
- * @param year
- */
- {template .welcome}
- <h1 id="greeting">{$greeting}</h1>
- The year is {$year}.
- {/template}
- java -jar ../closure-templates/build/SoyToJsSrcCompiler.jar \
- --outputPathFormat hello.soy.js \
- --shouldGenerateJsdoc \
- --shouldProvideRequireSoyNamespaces hello.soy
- // This file was automatically generated from hello.soy.
- // Please don't edit this file by hand.
- goog.provide('example.templates');
- goog.require('soy');
- goog.require('soy.StringBuilder');
- /**
- * @param {Object.<string, *>=} opt_data
- * @param {soy.StringBuilder=} opt_sb
- * @return {string|undefined}
- * @notypecheck
- */
- example.templates.welcome = function(opt_data, opt_sb) {
- var output = opt_sb || new soy.StringBuilder();
- output.append('<h1 id="greeting">', soy.$escapeHtml(opt_data.greeting),
- '</h1>The year is ', soy.$escapeHtml(opt_data.year), '.');
- if (!opt_sb) return output.toString();
- };
- goog.provide('example');
- goog.require('example.templates');
- goog.require('goog.dom');
- example.sayHello = function(message) {
- var data = {greeting: message, year: new Date().getFullYear()};
- var html = example.templates.welcome(data);
- goog.dom.getElement('hello').innerHTML = html;
- };
- <!doctype html>
- <html>
- <head>
- <title>Example: Hello World</title>
- </head>
- <body>
- <div id="hello"></div>
- <script src="../closure-library/closure/goog/base.js"></script>
- <script>goog.require('goog.string.StringBuffer');</script>
- <script src="../closure-templates/javascript/soyutils_usegoog.js"></script>
- <script src="hello.soy.js"></script>
- <script src="hello.js"></script>
- <script>
- example.sayHello('Hello World!');
- </script>
- </body>
- </html>
现在可以在浏览器中运行看效果,尽管可以手动添加依赖。但有一工具可更好地来完成此功能:calcdeps.py
- python ../closure-library/closure/bin/calcdeps.py \
- --dep ../closure-library \
- --path ../closure-templates/javascript \
- --path hello.soy.js \
- --path hello.js \
- --output_mode deps > hello-deps.js
- <!doctype html>
- <html>
- <head>
- <title>Example: Hello World</title>
- </head>
- <body>
- <div id="hello"></div>
- <script src="../closure-library/closure/goog/base.js"></script>
- <script src="hello-deps.js"></script>
- <script>
- goog.require('example');
- </script>
- <script>
- example.sayHello('Hello World!');
- </script>
- </body>
- </html>
现在我们有一堆javascript代码了,应该考虑编译了:
- python ../closure-library/closure/bin/calcdeps.py \
- --path ../closure-library \
- --path ../closure-templates/javascript/soyutils_usegoog.js \
- --path hello.soy.js \
- --input hello.js \
- --compiler_jar ../closure-compiler/build/compiler.jar \
- --output_mode compiled \
- --compiler_flags="--compilation_level=ADVANCED_OPTIMIZATIONS" \
- > hello-compiled.js
现在hello.html可改为:
- <!doctype html>
- <html>
- <head>
- <title>Example: Hello World</title>
- </head>
- <body>
- <div id="hello"></div>
- <script src="hello-compiled.js"></script>
- <script>
- example.sayHello('Hello World!');
- </script>
- </body>
- </html>
不幸的是,这将不能正确运行,因为example变量已经被改命了,为了让编译后原方法引用不变,在hello.js中加入如下代码:
- goog.exportSymbol('example.sayHello', example.sayHello);
- python ../closure-library/closure/bin/calcdeps.py \
- --path ../closure-library \
- --path ../closure-templates/javascript/soyutils_usegoog.js \
- --path hello.soy.js \
- --input hello.js \
- --compiler_jar ../closure-compiler/build/compiler.jar \
- --output_mode compiled \
- --compiler_flags="--compilation_level=ADVANCED_OPTIMIZATIONS" \
- --compiler_flags="--define=goog.userAgent.ASSUME_GECKO=true" \
- --compiler_flags "--define=goog.userAgent.ASSUME_WINDOWS=true" \
- --compiler_flags="--define=goog.userAgent.jscript.ASSUME_NO_JSCRIPT=true" \
- > hello-compiled-for-firefox-on-windows.js
编译参数将会在后面详细讲解,对于 ADVANCED_OPTIMIZATIONS.将在第13章介绍,现在你只需要知道这参数是将javascript动态优化的一个方式。
Closure 测试框架
尽管这代码好像在浏览器中工作得很好,但最好的主意还是创建一个单元测试来保证正确性。在这个用例中,example.templates.welcome将被测试其输入的正确性。首先创建一个页面:hello_test.html:
- <!doctype html>
- <html>
- <head>
- <title>Unit Test for hello.js</title>
- <script src="../closure-library/closure/goog/base.js"></script>
- <script src="hello-deps.js"></script>
- <script src="hello_test.js"></script>
- </head>
- <body>
- <div id="hello"></div>
- </body>
- </html>
- goog.require('goog.testing.jsunit');
- goog.require('example');
- goog.require('goog.dom');
- goog.require('goog.dom.NodeType');
- var testHtmlEscaping = function() {
- example.sayHello('<b>greeting</b>');
- var greetingEl = goog.dom.getElement('greeting');
- assertEquals('The <h1 id="greeting"> element should only have one child node',
- 1, greetingEl.childNodes.length);
- assertEquals('The <h1 id="greeting"> element should only contain text',
- goog.dom.NodeType.TEXT, greetingEl.firstChild.nodeType);
- };
因为Closure Inspector是调试编译后的javascript,hello.js中将加入一个bug用来演示这个工具的使用。不是加入一个真实的bug,只是简单地加入下个debugger块到hello.js中:
- goog.provide('example');
- goog.require('example.templates');
- goog.require('goog.dom');
- example.sayHello = function(message) {
- var data = {greeting: message, year: new Date().getFullYear()};
- var html = example.templates.welcome(data);
- debugger;
- goog.dom.getElement('hello').innerHTML = html;
- };
- goog.exportSymbol('example.sayHello', example.sayHello);
重新编译:添加一个编译参数:--create_souce_map,这是用于生成Inspector工具所需的
- python ../closure-library/closure/bin/calcdeps.py \
- --path ../closure-library \
- --path ../closure-templates/javascript/soyutils_usegoog.js \
- --path hello.soy.js \
- --input hello.js \
- --compiler_jar ../closure-compiler/build/compiler.jar \
- --output_mode compiled \
- --compiler_flags="--compilation_level=ADVANCED_OPTIMIZATIONS" \
- --compiler_flags="--create_source_map=./hello-map" \
- > hello-compiled.js
当Closure Inspector安装后,会有Source Mapping选项,设置正确径。现在你可以开始调试代码了。


 4870
4870


 被折叠的 条评论
为什么被折叠?
被折叠的 条评论
为什么被折叠?
 到【灌水乐园】发言


