One of the items in my ever-growing list of things to write about, is the rendering techniques I used in Flower Garden. In the end, it would make for a post with lots of pretty pictures, but there’s nothing particularly ground-breaking. After all, it’s all limited to OpenGL ES 1.1 on the iPhone, which means only two texture units and a two-stage texture combiner. As a result, more interesting ideas keep bubbling up to the top of the list and the poor rendering idea keeps getting passed over.
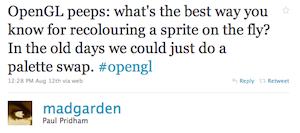
Every so often, something happens that bumps up the priority of one of the items in my list. Maybe it’s another related blog post, or a game coming out with something relevant to what I wanted to write about. In this case it was a tweet from Paul Pridham [1]:
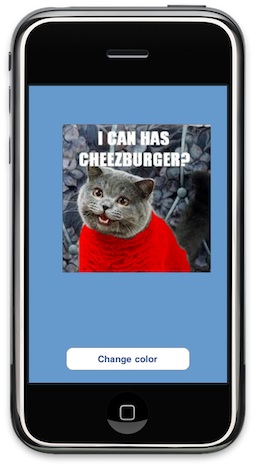
Customizing colors in a sprite or texture is very frequent in games, from changing player characters into blue and red teams, to creating color variations of an armor piece, to letting the player pick the exact shade for their pet’s fur color. Or, in the case of Flower Garden, to change the colors of the petals on the fly.
There are two requirements for this:
- We want to change colors dynamically.
- We only want to affect certain areas of the original texture.
That rules out creating texture variations ahead of time, although that might be a valid approach sometimes if you have lots of art resources, don’t mind increasing the download size, and you have a fixed number of variation to deal with. It also rules out modulating/blending the texture by a particular color because it would tint all the texture, and we want to limit the effect to particular areas (leave the player’s arms their normal color, but change their shirt color).
This is one of those funny cases that it was a lot easier to do many years ago, when we used palletized color modes. You could set all the custom color areas to a particular palette entry, and then update that entry on the fly. Ah, all the awesome tricks palettes opened up the door to! I still miss them to this day.
 In modern hardware it’s also really easy to do with a shader, but Paul wanted to use it across any iPhone device, and the majority of them are still stuck on OpenGL ES 1.1, so fixed-function pipeline it is.
The simplest approach would be to just render the model twice: First pass renders the texture, and second pass renders the custom color bits (you can render them with a white texture modulated by the global color to get the right color). The main drawbacks are that you’re doubling the number of draw calls, and, with 3D objects, it gets a bit tricker because the second pass needs to use the glDepthFunc(GL_EQUAL) depth comparison function.
The better way to do this is using the texture combiners. Texture combiners allow us to perform a limited number of operations to control the final look of a pixel. We can add two textures, or multiply them, or even do a few more complex operations. The true power of the combiners is that they can be chained together, so the output from one feeds into the input of another, allowing us to create much more complex operations.
The iPhone 3G is limited two two texture combiner units [2], but even two combiners are good to create a good range of effects.
Let’s think about what we want to accomplish. We want to leave some parts of the texture completely alone and display the original pixel value. In some other parts of the texture, we want to replace the pixels there with a custom color. Actually even better, we probably want to multiply those pixels by a custom color. That way we can author the part of the texture that is going to change with grayscale details, and our color adds the tint to it.
Let’s express it mathematically. Let’s make a function M that is 1 for every pixel we want to color, and 0 for the ones where the original texture is supposed to be displayed. Our desired color is c and the texture it t. In that case, the final pixel color (p) is:
p = M*(c*t) + (1 – M)*t


We could express that with two combiners: The first one is a modulate (multiply) operation with c and t, and the second one an interpolation operation between the result of the previous combiner and the original texture, based on the function M.
Obviously M is just a mask texture. We can paint it white where we want to color the texture, and black elsewhere. We could even use the alpha channel of the original texture, but there’s one big thing to watch out for: If you have your texture as a png and process it through the default iPhone resource operations, the image will be premultiplied for you (whether you want it or not), so your color information will be set to zero everywhere that the alpha channel is zero. Oops. You’ll probably want to use the alpha channel to store transparency anyway, so we’ll keep the mask separate. If not, make sure you encode the image yourself (as raw or PVRT formats) so it’s not premultiplied ahead of time.
Are we ready transfer that formula to the texture combiners? Not quite. Apparently (and this was just trial and error, I haven’t seen it documented), the texture assigned to a combiner can only be the one at that stage. If you look at the second combiner, we would need to have the first texture as one of the parameters, in addition to the mask.
So instead, we can reorganize the function above like this:
p = c*(M*t) + (t – M*t)
What did we gain by that? The color is what’s going to change dynamically, but the mask and the texture always stay the same. We could precompute the M*t term by simply multiplying the texture and the mask. We can call that new term A. We can do the same thing with the (t – M*t) term, which just means turning black all the pixels in the texture where mask will go. That one will be B. The easiest way to “precompute” those values is just doing it in Photoshop and exporting it as a new png.

Our new formula is now:
p = c*A + B
Nice and simple! Now we can really add that to the texture combiners like this:
// c
glColor4f(m_customColor.r, m_customColor.g, m_customColor.b, 1);

glActiveTexture(GL_TEXTURE0);
// A = M*t (precomputed)
glBindTexture(GL_TEXTURE_2D, m_maskHandle);
glEnable(GL_TEXTURE_2D);
// c*A
glTexEnvi(GL_TEXTURE_ENV, GL_TEXTURE_ENV_MODE, GL_MODULATE);

glActiveTexture(GL_TEXTURE1);
// B = t - M*t (precomputed)
glBindTexture(GL_TEXTURE_2D, m_textureHandle);
glEnable(GL_TEXTURE_2D);

// c*A + B
glTexEnvi(GL_TEXTURE_ENV, GL_TEXTURE_ENV_MODE, GL_COMBINE);
glTexEnvi(GL_TEXTURE_ENV, GL_COMBINE_RGB, GL_ADD);
glTexEnvi(GL_TEXTURE_ENV, GL_SRC0_RGB, GL_PREVIOUS);
glTexEnvi(GL_TEXTURE_ENV, GL_SRC1_RGB, GL_TEXTURE);
One more thing to watch out for: Because we’re using two textures, you need to have two sets of texture coordinates. In this case, we want them to be the same, so we can just point them to the same set of data:
glClientActiveTexture(GL_TEXTURE0);
glTexCoordPointer(2, GL_FLOAT, sizeof(Vertex), &vertices[0].u);
glEnableClientState(GL_TEXTURE_COORD_ARRAY);
glClientActiveTexture(GL_TEXTURE1);
glTexCoordPointer(2, GL_FLOAT, sizeof(Vertex), &vertices[0].u);
glEnableClientState(GL_TEXTURE_COORD_ARRAY);
That’s it! You can see the results in the included project and play with the register combiners to achieve different operations.
At this point I was going to describe the texture combiner setup I use in Flower Garden to render the petals, but this post ended up taking longer than I had hoped for (I’m trying to shoot for an hour per post, but this has taken me already two hours between the code and the the post itself), so I’ll save that for another time.
- Demo source code. Released under the MIT license.
[1] Paul developed Sword of Fargoal, by far my favorite iPhone RPG.
[2] The 3GS allows up to eight I believe.
This post is part of iDevBlogADay, a group of indie iPhone development blogs featuring two posts per day. You can keep up with iDevBlogADay through the web site, RSS feed, or Twitter.
New blog post: Customizable Color Sections With OGL ES 1.1 http://gamesfromwithin.com/customizable-… #idevblogaday #opengl
@SnappyTouch Just wanted to say that I’m really enjoying your blog posts. Very informative and useful.
@SnappyTouch one hour per post?! Just preparing the next one I’m already past 8! :'(
@mysterycoconut The trick is to think of them as what they are: Disposable blog post. They’re not chapter in a book or a peer-reviewed paper
@SnappyTouch uh, OK *crossing title “Chapter 4: the Early Years” out*
@SnappyTouch lol I implemented that feature for a football game a few months ago, we had striped shirts on it too – fancy 😉
@barog Just curious, did you end up doing the mask ops the same way, or did you configure them differently? Seems you could do it diff ways
@SnappyTouch We weren’t actually masking in the end just colouring a grayscale tex. Would have done the same as you if both were needed.
@SnappyTouch Thanks as always – another extremely informative blog post!
Nice! Thanks for sharing.
Thanks Noel! 😀
Not really connected to opengl or anything but this post reminded me of the old color cycling technique [used to overcome limitation of hardware]; a good example can be found here:
http://www.effectgames.com/demos/canvascycle/?sound=0
From:
http://www.effectgames.com/effect/article.psp.html/joe/Old_School_Color_Cycling_with_HTML5
how about the use of blending to achieve similar effect?
http://nehe.gamedev.net/data/lessons/lesson.asp?lesson=20
nice article about texture combiners. Thanks
Hello.This
Article
Was Really
Fascinating, Judi Bola Teraman Indonesia Especially
Since
I Was Searching
For Thoughts On This Matter
Last Thursday.
You
Are A Very Intelligent
Person! Judi Indonesia Online Teraman