A detailed guide on developing Android apps using the Clean Architecture pattern
Ever since I started developing Android apps there was this feeling that it could be done better. I’ve seen a lot of bad software design decisions during my career, some of which were my own — and Android complexity mixed with bad software design is a recipe for disaster. But it is important to learn from your mistakes and keep improving. After a lot of searching for a better way to develop apps I encountered the Clean Architecture. After applying it to Android, with some refinement and inspiration from similar projects, I decided that this approach is practical enough and worth sharing.
The goal of this article is to provide a step-by-step guide for developing Android apps in a Clean way. This whole approach is how I’ve recently been building my apps for clients with great success.
What is Clean Architecture?
I will not go into too much detail here as there are articles that explain it much better than I can. But the next paragraph provides the crux of what you need to know to understand Clean.
Generally in Clean, code is separated into layers in an onion shape with one dependency rule: The inner layers should not know anything about the outer layers. Meaning that the dependencies should point inwards.
This is the previous paragraph visualized:
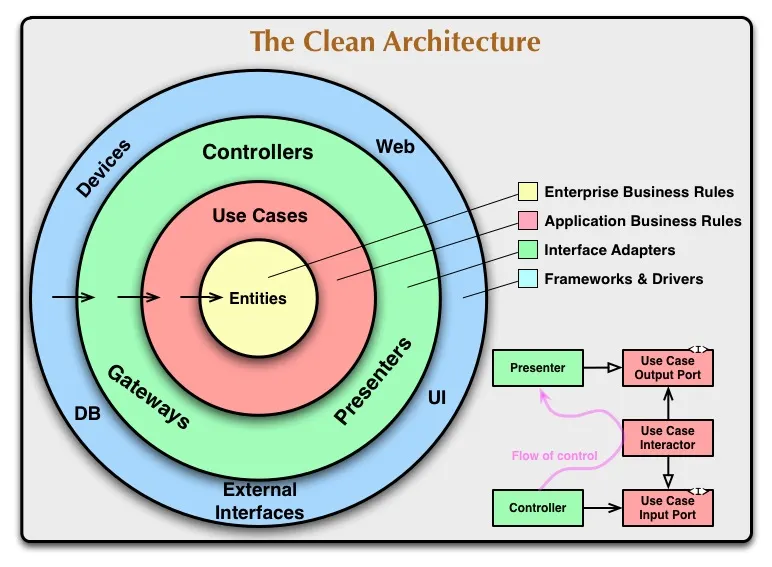
Clean Architecture, as mentioned in the provided articles, makes your code:
- Independent of Frameworks
- Testable.
- Independent of UI.
- Independent of Database.
- Independent of any external agency.
I will hopefully make you understand how these points are achieved with examples below. For a more detailed explanation of Clean I really recommend this article and this video.
What this means for Android
Generally, your app can have an arbitrary amount of layers but unless you have Enterprise wide business logic that you have to apply in every Android app, you will most often have 3 layers:
- Outer: Implementation layer
- Middle: Interface adapter layer
- Inner: Business logic layer
The implementation layer is where everything framework specific happens. Framework specific code includes every line of code that is not solving the problem you set to solve, this includes all Android stuff like creating activities and fragments, sending intents, and other framework code like networking code and databases.
The purpose of the interface adapter layer is to act as a connector between your business logic and framework specific code.
The most important layer is the business logic layer. This is where you actually solve the problem you want to solve building your app. This layer does not contain any framework specific code and you should be able to run it without an emulator. This way you can have your business logic code that is easy to test, develop and maintain. That is the main benefit of the Clean Architecture.
Each layer, above the core layer, is also responsible for converting models to lower layer models before the lower layer can use them. An inner layer can not have a reference to model class that belongs to the outer layer. However, the outer layer can use and reference models from the inner layer. Again, this is due to our dependency rule. It does create overhead but it is necessary for making sure code is decoupled between layers.
Why is this model conversion necessary? For example, your business logic models might not be appropriate for showing them to the user directly. Perhaps you need to show a combination of multiple business logic models at once. Therefore, I suggest you create a ViewModel class that makes it easier for you to display it to the UI. Then, you use a converter class in the outer layer to convert your business models to the appropriate ViewModel.
Another example might be the following: Let’s say you get a Cursor object from a ContentProvider in an outer database layer. Then the outer layer would convert it to your inner business model first, and then send it to your business logic layer to be processed.
I will add more resources to learn from at the bottom of the article. Now that we know about the basic principles of the Clean Architecture, let’s get our hands dirty with some actual code. I will show you how to build an example functionality using Clean in the next section.
How do I start writing Clean apps?
I’ve made a boilerplate project that has all of the plumbing written for you. It acts as a Clean starter pack and is designed to be built upon immediately with most common tools included from the start. You are free to download it, modify it and build your apps with it.
You can find the starter project here: Android Clean Boilerplate
Getting started writing a new use case
This section will explain all the code you need to write to create a use case using the Clean approach on top of the boilerplate provided in the previous section. A use case is just some isolated functionality of the app. A use case may (e.g. on user click) or may not be started by a user.
First let’s explain the structure and terminology of this approach. This is how I build apps but it is not set in stone and you can organize it differently if you want.
Structure
The general structure for an Android app looks like this:
- Outer layer packages: UI, Storage, Network, etc.
- Middle layer packages: Presenters, Converters
- Inner layer packages: Interactors, Models, Repositories, Executor
Outer layer
As already mentioned, this is where the framework details go.
UI — This is where you put all your Activities, Fragments, Adapters and other Android code related to the user interface.
Storage — Database specific code that implements the interface our Interactors use for accessing data and storing data. This includes, for example, ContentProviders or ORM-s such as DBFlow.
Network — Things like Retrofit go here.
Middle layer
Glue code layer which connects the implementation details with your business logic.
Presenters — Presenters handle events from the UI (e.g. user click) and usually serve as callbacks from inner layers (Interactors).
Converters — Converter objects are responsible for converting inner models to outer models and vice versa.
Inner layer
The core layer contains the most high-level code. All classes here are POJOs. Classes and objects in this layer have no knowledge that they are run in an Android app and can easily be ported to any machine running JVM.
Interactors — These are the classes which actually contain your business logic code. These are run in the background and communicate events to the upper layer using callbacks. They are also called UseCases in some projects (probably a better name). It is normal to have a lot of small Interactor classes in your projects that solve specific problems. This conforms to the Single Responsibility Principle and in my opinion is easier on the brain.
Models — These are your business models that you manipulate in your business logic.
Repositories — This package only contains interfaces that the database or some other outer layer implements. These interfaces are used by Interactors to access and store data. This is also called a repository pattern.
Executor — This package contains code for making Interactors run in the background by using a worker thread executor. This package is generally not something you need to change.
A simple example
In this example, our use case will be: “Greet the user with a message when the app starts where that message is stored in the database.” This example will showcase how to write the following three packages needed to make the use case work:
- the presentation package
- the storage package
- the domain package
The first two belong to the outer layer while the last one is the inner/core layer.
Presentation package is responsible for everything related to showing things on the screen — it includes the whole MVP stack (it means it also includes both the UI and Presenter packages even though they belong to different layers).
OK — less talk, more code.
Writing a new Interactor (inner/core layer)
In reality you could start in any layer of the architecture, but I recommend you to start on your core business logic first. You can write it, test it and make sure it works without ever creating an activity.
So let’s start by creating an Interactor. The Interactor is where the main logic of the use case resides. All Interactors are run in the background thread so there shouldn’t be any impact on UI performance. Let’s create a new Interactor with a warm name of WelcomingInteractor.
public interface WelcomingInteractor extends Interactor {

    interface Callback {

        void onMessageRetrieved(String message);

        void onRetrievalFailed(String error);
    }
}
The Callback is responsible for talking to the UI on the main thread, we put it into this Interactor’s interface so we don’t have to name it a WelcomingInteractorCallback — to distinguish it from other callbacks. Now let’s implement our logic of retrieving a message. Let’s say we have a MessageRepository that can give us our welcome message.
public interface MessageRepository {
    String getWelcomeMessage();
}
Now let’s implement our Interactor interface with our business logic. It is important that the implementation extends the AbstractInteractor which takes care of running it on the background thread.
This just attempts to retrieve the message and sends the message or the error to the UI to display it. We notify the UI using our Callback which is actually going to be our Presenter. That is the crux of our business logic. Everything else we need to do is framework dependent.
Let’s take a look which dependencies does this Interactor have:
As you can see, there is no mention of any Android code. That is the main benefit of this approach. You can see that the Independent of Frameworks point holds. Also, we do not care about specifics of the UI or database, we just call interface methods that someone somewhere in the outer layer will implement. Therefore, we are Independent of UI and Independent of Databases.
Testing our Interactor
We can now run and test our Interactor without running an emulator. So let’s write a simple JUnit test to make sure it works:
Again, this Interactor code has no idea that it will live inside an Android app. This proves that our business logic is Testable, which was the second point to show.
Writing the presentation layer
Presentation code belongs to the outer layer in Clean. It consists of framework dependent code to display the UI to the user. We will use the MainActivity class to display the welcome message to the user when the app resumes.
Let’s start by writing the interface of our Presenter and View. The only thing our view needs to do is to display the welcome message:
public interface MainPresenter extends BasePresenter {

    interface View extends BaseView {
        void displayWelcomeMessage(String msg);
    }
}
So how and where do we start the Interactor when an app resumes? Everything that is not strictly view related should go into the Presenter class. This helps achieve separation of concerns and prevents the Activity classes from getting bloated. This includes all code working with Interactors.
In our MainActivity class we override the onResume() method:
@Override
protected void onResume() {
    super.onResume();    // let's start welcome message retrieval when the app resumes
    mPresenter.resume();
}
All Presenter objects implement the resume() method when they extend BasePresenter.
Note: Astute readers will probably see that I have added Android lifecycle methods to the BasePresenter interface as helper methods, even though the Presenter is in a lower layer. The Presenter should not know about anything in the UI layer — e.g. that it has a lifecycle. However, I’m not specifying Android specific *event* here as every UI has to be shown to the user sometime. Imagine I called it onUIShow() instead of onResume(). It’s all good now, right? :)
We start the Interactor inside the MainPresenter class in the resume() method:
@Override
public void resume() {    mView.showProgress();    // initialize the interactor
    WelcomingInteractor interactor = new WelcomingInteractorImpl(
            mExecutor,
            mMainThread,
            this,
            mMessageRepository
    );    // run the interactor
    interactor.execute();
}
The execute() method will just execute the run() method of the WelcomingInteractorImpl in a background thread. The run() method can be seen in the Writing a new Interactor section.
You may notice that the Interactor behaves similarly to the AsyncTask class. You supply it with all that it needs to run and execute it. You might ask why didn’t we just use AsyncTask? Because that is Android specific code and you would need an emulator to run it and to test it.
We provide several things to the interactor:
- The ThreadExecutor instance which is responsible for executing Interactors in a background thread. I usually make it a singleton. This class actually resides in the domain package and does not need to be implemented in an outer layer.
- The MainThreadImpl instance which is responsible for posting runnables on the main thread from the Interactor. Main threads are accessible using framework specific code and so we should implement it in an outer layer.
- You may also notice we provide this to the Interactor — MainPresenter is the Callback object the Interactor will use to notify the UI for events.
- We provide an instance of the WelcomeMessageRepository which implements the MessageRepository interface that our interactor uses. The WelcomeMessageRepository is covered later in the Writing the storage layer section.
Note: Since there are many things you need to provide to an Interactor each time, a dependency injection framework like Dagger 2 would be useful. But I choose not to include it here for simplicity. Implementation of such a framework is left to your own discretion.
Regarding this, the MainPresenter of the MainActivity really does implement the Callback interface:
public class MainPresenterImpl extends AbstractPresenter implements MainPresenter, WelcomingInteractor.Callback {And that is how we listen for events from the Interactor. This is the code from the MainPresenter:
@Override
public void onMessageRetrieved(String message) {
    mView.hideProgress();
    mView.displayWelcomeMessage(message);
}

@Override
public void onRetrievalFailed(String error) {
    mView.hideProgress();
    onError(error);
}
The View seen in these snippets is our MainActivity which implements this interface:
public class MainActivity extends AppCompatActivity implements MainPresenter.View {Which is then responsible for displaying the welcome message, as seen here:
@Override
public void displayWelcomeMessage(String msg) {
    mWelcomeTextView.setText(msg);
}
And that is pretty much it for the presentation layer.
Writing the storage layer
This is where our repository gets implemented. All the database specific code should come here. The repository pattern just abstracts where the data is coming from. Our main business logic is oblivious to the source of the data — be it from a database, a server or text files.
For complex data you can use ContentProviders or ORM tools such as DBFlow. If you need to retrieve data from the web then Retrofit will help you. If you need simple key-value storage then you can use SharedPreferences. You should use the right tool for the job.
Our database is not really a database. It is going to be a very simple class with some simulated delay:
public class WelcomeMessageRepository implements MessageRepository {
    @Override
    public String getWelcomeMessage() {
        String msg = "Welcome, friend!"; // let's be friendly

        // let's simulate some network/database lag
        try {
            Thread.sleep(2000);
        } catch (InterruptedException e) {
            e.printStackTrace();
        }

        return msg;
    }
}
As far as our WelcomingInteractor is concerned, the lag might be because of the real network or any other reason. It doesn’t really care what is underneath the MessageRepository as long as it implements that interface.
Summary
This example can be accessed on a git repository here. The summarized version of calls by class is as follows:
MainActivity ->MainPresenter -> WelcomingInteractor -> WelcomeMessageRepository -> WelcomingInteractor -> MainPresenter -> MainActivity
It is important to note the flow of control:
Outer — Mid — Core — Outer — Core — Mid — Outer
It is common to access the outer layers multiple times during a single use case. In case you need to display something, store something and access something from the web, your flow of control will access the outer layer at least three times.
Conclusion
For me, this has been the best way to develop apps so far. Decoupled code makes it easy to focus your attention on specific issues without a lot of bloatware getting in the way. After all, I think this is a pretty SOLID approach but it does take some time getting used to. That was also the reason I wrote all of this, to help people understand better with step-by-step examples. If anything remains unclear I will gladly address those concerns as your feedback is very important. I would also very much like to hear what can be improved. A healthy discussion would benefit everyone.
I have also built and open sourced a sample cost tracker app with Clean to showcase how the code would look like on a real app. It’s nothing really innovative in terms of features but I think it covers what I talked about well with a bit more complex examples. You can find it here: Sample Cost Tracker App
And again, that sample app was built upon the Clean starter pack that can be found here: Android Clean Boilerplate
Further reading
This guide was meant to expand upon this awesome article. The difference is that I used regular Java in my examples as to not add too much overhead in showcasing this approach. If you want RxJava examples with Clean then take a look here.